Owning a swimming pool in Central Texas is considered an absolute necessity for surviving the relentless summer heat. A backyard pool provides a private oasis for relaxation, exercise, and family entertainment. However, the unique environmental factors of the region make pool maintenance a highly demanding task. The brutal sun, drastic temperature fluctuations, and incredibly hard local water all place immense stress on the interior finish of your pool. When the surface begins to degrade, understanding the step by step timeline of pool resurfacing Austin TX is essential for homeowners who want to restore their backyard oasis.
The plaster inside your pool serves as the critical waterproof barrier that protects the underlying concrete shell. It is designed to be highly durable, but it is certainly not invincible. Stains, chips, and rough textures are all clear indicators that the material has reached the end of its functional lifespan. Resurfacing is a major construction project, and knowing exactly how the process works will help you prepare your property and manage your expectations.
Step One: Draining and Hydrostatic Relief
The very first step in the resurfacing process is completely draining the thousands of gallons of water from the pool. This must be done carefully to ensure the water is routed to the proper city cleanout drains in accordance with local Austin environmental regulations.
Once the pool is empty, the contractor must immediately open the hydrostatic relief valves located in the floor of the pool. Central Texas has expansive clay soils that hold massive amounts of groundwater. If the pool is empty and the groundwater pressure builds up beneath the shell, the entire concrete structure can literally pop out of the ground like a boat. Opening these valves allows the groundwater to flow safely into the empty pool, preventing catastrophic structural failure.
Step Two: Surface Preparation and Demolition
A new layer of plaster will absolutely not adhere to a dirty or decaying surface. The preparation phase is the loudest and messiest part of the entire project.
Workers will use pneumatic chisels to chip away the old plaster around the tile line, the return jets, and the main drains. In many cases, the contractor will perform a process called hydroblasting, which uses ultra high pressure water to strip away the topmost layer of the old, degraded plaster. This creates a highly textured, rough surface that allows the brand new cement material to form a permanent mechanical bond with the underlying gunite shell. If this preparation step is rushed, the new finish is guaranteed to delaminate and fail prematurely.
Step Three: The Bond Coat Application
Once the shell is completely clean, dry, and roughened, the crew will apply a specialized bond coat. This is a highly engineered liquid bonding agent that acts like a powerful glue between the old concrete shell and the new plaster mixture.
From draining and prep to finishing touches, pool resurfacing Austin TX is a step-by-step process. Clear Solutions makes it smooth, efficient, and built to last. The bond coat must be applied evenly across every square inch of the pool interior and allowed to dry completely before the final surfacing materials can be mixed.
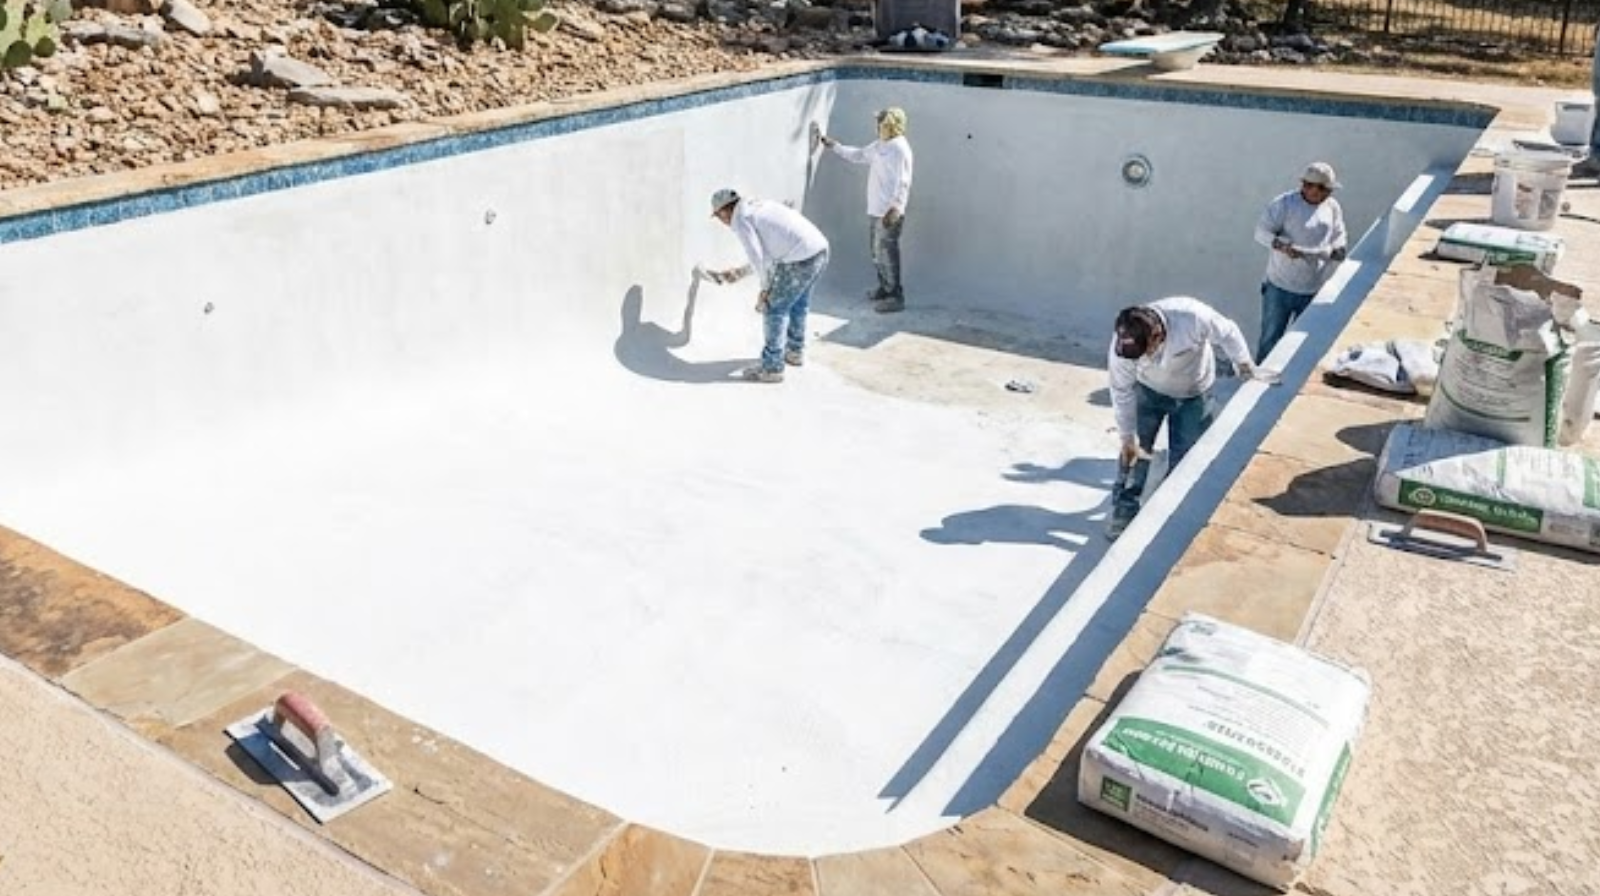
Step Four: Mixing and Troweling the New Finish
This is where the magic happens and your pool begins to look brand new again. Whether you have chosen standard white plaster, a durable quartz aggregate, or a premium pebble finish, the material is mixed on site in large batches.
The material is pumped into the pool through thick hoses, and a team of highly skilled artisans begins applying it to the walls and floor. They use specialized hand trowels to smooth the material, ensuring a perfectly even thickness and a comfortable texture. Applying pool plaster is a race against the clock, especially in the blistering Texas heat. The crew must work rapidly and seamlessly to prevent the cement from drying out and cracking before the finishing process is complete.
Step Five: Filling and The Curing Process
As soon as the troweling is finished, the contractor will place a hose at the bottom of the pool and begin refilling it immediately. It is absolutely critical that the water does not stop flowing until the pool is completely full. Stopping the water midway can leave a permanent “bathtub ring” stain on the brand new, uncured plaster.
The first twenty eight days after the pool is filled are known as the curing period. During this time, the new cement is highly reactive. The homeowner or a professional pool service must brush the entire pool surface twice a day to remove plaster dust and prevent scaling. The water chemistry must be monitored and adjusted daily to ensure the pH and calcium levels are perfectly balanced. Proper curing is the ultimate key to achieving a long lasting, beautiful pool finish.
Frequently Asked Questions (FAQ)
Q: How long does a standard pool finish typically last in Texas?
A: With perfect chemical maintenance, a traditional white plaster finish usually lasts seven to ten years. Premium quartz or pebble aggregate finishes can easily last fifteen to twenty years or more due to their enhanced durability.
Q: How many days does the entire resurfacing project take?
A: For a standard residential pool without any major structural repairs, the physical process of draining, prepping, applying the new finish, and refilling usually takes three to five days, depending entirely on local weather conditions.
Q: Can I just paint over my stained pool instead of resurfacing it completely?
A: Pool paint is highly discouraged by professional contractors. It is a very temporary fix that typically peels and chalks within one or two short years. Furthermore, applying paint makes future replastering much more difficult and expensive, as all the paint must be sandblasted off before new cement can bond to the shell.